Friday, April 3, 2015

Root Android dengan iRoot (tanpa PC)


Persiapan awal sebelum melakukan Root:
Aplikasi yang tidak terdapat di Play Store, Google Play, atau App Store terlebih dahulu harus di download di komputer, lalu dimasukkan ke perangkat Android menggunakan kabel data. Jika membutuhkan USB Driver untuk menghubungkan Android dan PC, silahkan cari dulu driver yang sesuai dengan perangkat Ponsel yang digunakan DISINI

Untuk menginstall aplikasi di luar Play Store, masuk ke Setting >> Security >> Unknown Source. Lalu centang/ aktifkan Aktifkan juga USB Debugging, pergi ke Settings >> Developer Options >> centang USB Debugging. 

Sedangkan utk Android versi 4.2 atau 4.3 ke atas, masuk ke Setting >> About Phone >>Tekan Build Number sebanyak 7x sampai muncul pesan "You are now a developer!"
Masuk juga ke Setting >> Developer Option >> centang USB Debugging.
 Root Android dengan iRoot (tanpa PC) , cara root android tanpa pc, cara root android tanpa komputer, cara mudah root android  sarewelah.blogspot.com

Cara Root menggunakan iRoot:
  1. Download Rootmaster DISINI.
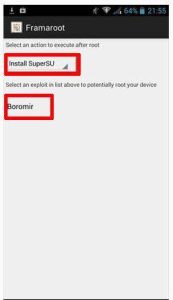
  2. Buka Rootmaster tunggu proses lalu tekan tombol hijau disamping gambar.
  3. Root Android dengan iRoot (tanpa PC) , cara root android tanpa pc, cara root android tanpa komputer, cara mudah root android  sarewelah.blogspot.com
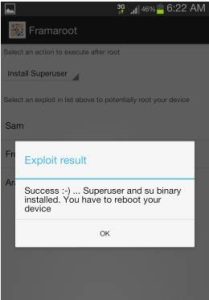
  4. Jika root berhasil akan tampak seperti gambar dibawah ini.

  5. Root Android dengan iRoot (tanpa PC) , cara root android tanpa pc, cara root android tanpa komputer, cara mudah root android  sarewelah.blogspot.com
  6. Restart Android, lalu cek apakah root berhasil atau tidak, menggunakan Root Checker.
Perangkat yang berhasil di Root menggunakan aplikasi iRoot ini antara lain:
  • Polytron W1351
  • Galaxy Ace 3
  • Himax polymer octacore
  • Mito A50
  • Imo Tab Z8 Nero
  • Imo Q8
  • Galaxy S3 mini
  • Tab 3 Lite SM-T111
  • Evercoss Elevate Y2
Jika mencari tutorial root yang lain silahkan cek di bawah ini:

Thursday, April 2, 2015

How To Root Tablet Lenovo IdeaTab A3000-H

How To Root Tablet Lenovo IdeaTab A3000-H

Lenovo IdeaTab A3000-H
Today we are going to show you How to Root Lenovo IdeaTab A3000-H with the easy method. After rooting you smartphone, you can install latest available firmwares on your device, install custom roms, and use apps which require root access. In short, you’ll gain access to your whole device, if know coding a bit, then you may customize it as you want.
After rooting your device, you will lose the device warranty. But you can gain your warranty by unrooting it. JellyDroid will not responsible for what you do with your device. So root Lenovo IdeaTab A3000-H at your own risk.
Here is the simple guide which will teach you how to root Lenovo IdeaTab A3000-H very easily.
  1. Download the latest version of Framaroot and install the APK.
  2. Now, Open Framaroot select the action to perform. Select “Install SuperSU”.
    framarootsupersu
  3. Thereafter, in the rooting menu, Select an exploit in list above to potentially root your device as BOROMIR and proceed further. The rooting has now started and you will be getting an awesome success message.
    framarootboromir
  4. When it i finished, just reboot your IdeaTab A3000-H.
Your lenovo tablet will be start automatically. Just try to find supersu app, if you find any app like this then your device is successfully rooted. You can also verify the root using Root Checker app from the Google Play Store.
To UNROOT, follow the same procedure but select “unroot” while performing step #2 and skip further. It will automatically unroot your device.

Cara Setting Modem ADSL Linksys Untuk Internet Speedy


Model Modem ADSL sangat banyak beredar di pasaran, namun saya lebih suka menggunakan Modem ADSL dari Linksys. Berikut ini kelebihan Modem ADSL Linksys antara lain :
  1. Penyetingan yangrelatif mudah
  2. Mempunyai 4 Slot LAN
  3. Mempunyai Wireless 
  4. Secara otomatis Connect ke Jaringan apabila terjadi Disconnect
Pada postingan kali ini saya akan membagikan sedikit informasi mengenai Cara Setting Modem ADSL Liknsys untuk internet speedy. Adapun langkah-langkahnya sebagai berikut :
  • Buka Browser anda dan Ketikkan alamat defaultnya 192.168.1.1 dan masukkan username : admin dan password : admin
  • Maka akan muncul Windows Dialog pada Menu Setup, seperti berikut ini :
  • Lalu isikan 
  • Encapsulation : RFC 2516 PPPoE
  • Multiplexing : LLC
  • QoS Type : UBR
  • PCR: Kosongkan
  • SCR : Kosongkan
  • Autodetect : Disable
  • VIrtual Circuit : VPI : 8 (Disesuaikan dengan Kode Wilayah Speedy)VCI : 81 (Disesuaikan juga)
  • User name : diisi dengan Nomor Speedy@telkom.net
  • Password : diisi password Speedy anda
  • Connect on Demand - Max Idle Time : Biarkan tanpa tanda check
  • Keep Alive - Redial Period : Bisa diatur sesuai keinginan kita (Standard 30 detik)
  • Host Name : Kosongkan
  • Domain Name : Kosongkan
  • MTU : Auto
  • Size : 1492 (Standard)
  • Local IP : 192.168.1.1 (Dapat dirubah sesuai Setingan Jaringan Anda)
  • Subnet Mask : 255.255.255.0
  • DHCP Server : Disable
  • Timezone : GMT+07.00 Bangko, Hanoi, Jakarta
  • Lalu Klik SAVE SETTING untuk menyimpan settingan yang telah dibuat.
  • Selesai
Terima Kasih ^^
sumber:http://olandsky.blogspot.com/2013/01/cara-setting-modem-adsl-linksys.html
http://www.resepkuekeringku.com/2014/11/resep-donat-empuk-ala-dunkin-donut.html http://www.resepkuekeringku.com/2015/03/resep-kue-cubit-coklat-enak-dan-sederhana.html http://www.resepkuekeringku.com/2014/10/resep-donat-kentang-empuk-lembut-dan-enak.html http://www.resepkuekeringku.com/2014/07/resep-es-krim-goreng-coklat-kriuk-mudah-dan-sederhana-dengan-saus-strawberry.html http://www.resepkuekeringku.com/2014/06/resep-kue-es-krim-goreng-enak-dan-mudah.html http://www.resepkuekeringku.com/2014/09/resep-bolu-karamel-panggang-sarang-semut-lembut.html