Saturday, March 8, 2014

Cara Menambahkan Menu Send To di Windows 7 dan 8

Cara Menambahkan Menu Send To di Windows 7 dan 8

Menu Send To di klik kanan sangatlah bermanfaat apalagi bila kamu seorang yang suka mengirim banyak file ke folder berbeda. Dengan adanya Send To proses kirim mengirim file bisa dilakukan dengan cepat. Menu standart yang ada di Send To umumnya ada 7 namun jika ada usb drive yang menancap maka akan ada 8. Ketika kamu menambahkan Shift saat mengklik kanan, maka menu Send To akan bertambah banyak. Itu adalah salah satu rahasia Mouse yang sudah PG bahas sebelumnya.
Menu Send To yang ditambahkan dengan Shift akan mengeluarkan menu yang sebenarnya ada di library Windows. Sedangkan untuk menu Send To biasa memanggil menu di %UserProfile%\AppData\Roaming\Microsoft\Windows\SendTo. Jadi untuk bisa menambahkan menu baru di Send To dengan mengkopikan shortcut folder atau file ke folder SendTo. Berikut caranya:
1. Pertama-tama tekan shortcut keyboard Win+R untuk memunculkan Run.
Cara Menambahkan Menu Send To di Windows 7 dan 8

2. Kemudian tuliskan perintah dibawah dan tekan enter.
%UserProfile%\AppData\Roaming\Microsoft\Windows\SendTo atau shell:sendto
Cara Menambahkan Menu Send To di Windows 7 dan 8

3. Setelah folder SendTo terbuka, disinilah kamu dapat menambahkan menu.
Cara Menambahkan Menu Send To di Windows 7 dan 8

4. Klik kanan pada area bebas di folder SendTo, kemudian pilih New>Shortcut.
Cara Menambahkan Menu Send To di Windows 7 dan 8

5. Pilih folder atau file untuk ditambahkan ke menu Send To.
Cara Menambahkan Menu Send To di Windows 7 dan 8

6. Setelah itu kamu akan menemukan folder shortcut yang telah kamu buat tadi.
Cara Menambahkan Menu Send To di Windows 7 dan 8

7. Terakhir coba kamu kirimkan file, jika folder atau file yang telah kamu buat berhasil maka akan muncul di menu Send To.
Cara Menambahkan Menu Send To di Windows 7 dan 8

Cara ini juga telah PG coba di Windows 8 dan berhasil. Kalau cara diatas membuat kamu merasa ribet, kamu bisa menggunakan software SendToSendTo. Nah itulah tips yang bisa PG berikan, bila kamu mempunyai tips lain untuk menambahkan menu Send To tinggalkan di kolom komentar.

MENAMBAHKAN GAMES KE HDD PS2

Langsung saja yah gak usah basa-basi
capek juga nulisnya… hehehe 
langkah pertama yang harus anda lakukan adalah mendownload softwarenya yang bernama Winhiip
Download
setelah selesai anda download, langsung ke tahap yang kedua
1. clip_image002pertama buka Winhiip tampilanya akan seperti ini
2. kemudian klik lanjut
3. clip_image004tampilanya akan seperti ini
,
4. Klik Select Drive dan pilih Drive 1 kaya gambar dibawah, terus klik drive PS2, maka tampilannya kaya gambar di bawah ini


clip_image005

5. Maka tampilanya akan seperti ini


clip_image006

6. Klik Add Image(s), untuk mengopy game ke HDD PS temen-temen, tampilannya seperti gambar dibawah ini.


clip_image007

7. Cari dan pilih file Game.iso yang anda simpan diharddisk komputer yang ingin diinstal ke harddisk Playstation dan akan tampak seperti gambar dibawah ini (anda bisa langsung menambahkan lebih dari satu file dengan mengklik Add Image(s) kembali dan lakukan seperti cara diatas) dan jika sudah, klik Start.


clip_image008

8. Tentukan Nama Menu, Boot File, Media Type, dan Compatibility (Untuk settingan compatibility, sebagian besar game dapat jalan dengan normal di settingan 3,6, tapi jika game tidak bisa jalan normal rubah ke settingan 2,3,4,5,6,7,8, tapi masih hang juga, coba kosongkan settingan. Jika temen-temen mendapatkan game yang jalan terus sementara main langsung hang biasanya karena pengaruh settingannya, biasa juga karena pengaruh instalasinya yang corup atau file game yang diinstal yang bermasalah.)
clip_image009
9. Jika pengaturan sudah selesai, klik OK seperti gambar diatas, dan tunggu instalasi game selesai, dan jika instalasi berhasil, maka akan tampak game yang tadi diinstal masuk seperti gambar dibawah ini.
clip_image010
10. Tapi jika anda pengen langsung menginstal game dari CD/DVD game Playstation 2, maka masukkan CD/DVD game Playstation 2 di CD/DVD Rom PC dan klik Add Image(s) dan pilih CD/DVD Drive, dalam gambar CD/DVD Drive F: seperti dibawah ini.
clip_image011
Kemudian ikuti proses instalasi seperti cara yang diatas dan Finish.
Selesai sudah anda menambahkan game di hardisk ps2 anda

Wednesday, March 5, 2014

Membuat Aplikasi Penjualan Sederhana dengan Visual Basic 6.0

Membuat Aplikasi Penjualan Sederhana dengan Visual Basic 6.0


cara membuat aplikasi penjualan yang sangat sederhana menggunakan visual basic 6.0 dengan database SQL Server 2000. Pastikan Anda sudah mengaktifkan SQL Server Service Manager. . Kemudian buatlah database dengan nama “Penjualan”, . Lalu buatlah beberapa tabel dengan struktur tabel seperti di bawah ini :
Tabel Barang

Tuesday, March 4, 2014

Automatic Repair couldn't repair your PC


Automatic Repair couldn't repair your PC

I've tried every option in the boot options menu and cannot get Windows 8 to boot. I just get 'Automatic Repair couldn't repair your PC." And later: "Log file: D:\Windows\System32\Logfiles\Srt\SrtTrail.txt" with the Shut down and Advanced options button, which just takes me to the boot options screen.

I have no install media as this is originally a win7 machine for which I downloaded Windows 8.
I actually did find a recovery disc I'd made 3.5 years ago and was able to use that. I've also got a backup from more recently I was able to use to retrieve most of the files.
Sharief K

Found this helpful 2
Sharief K replied on
Microsoft Support Engineer
Hi Scott,

1.      What is the make and model of the computer?
2.      Have you tried the option “system restore” from advanced options?
3.      Were there any recent changes made on the computer prior to the issue?

Let’s try these methods and check if it helps.

Method 1: I would suggest you to create an installation media and try to perform automatic repair and check if it helps in fixing the issue.

How to create installation media for a PC refresh or reset:
http://windows.microsoft.com/en-US/windows-8/create-reset-refresh-media
Method 2:
a.       After Automatic Repair fails to repair your PC, select "Advanced options" and then "Troubleshoot".
b.      Select "Advanced options" and then select "Command Prompt".
c.       If prompted, enter in the password for the user name.
d.      At the Command Prompt, type the following commands and hit enter.

bootrec /fixMBR
bootrec /Fixboot
bootrec /rebuildBCD


Restart the computer and check the issue.

Create installation media for Windows 8.1

Create installation media for Windows 8.1

If you need to reinstall Windows 8.1 or you want to install it on a partition and you don't have installation media, you can create it using the Windows 8.1 Setup program. To create media you need to use a PC running Windows 8.1, Windows 8, or Windows 7, and it must have the same architecture (32 or 64-bit) as the PC you want to install Windows 8.1 on. You'll also need your Windows 8.1 product key.
You can usually find your product key in your online order info, in the confirmation email for your purchase, or on the DVD packaging. The product key will look something like this: XXXXX- XXXXX- XXXXX- XXXXX- XXXXX.

Important

  • If you don't have a Windows 8.1 product key, you can't create installation media. You can't use a Windows 8 product key for this.
  • Make sure the USB flash drive or DVD you're using has nothing else stored on it, and has enough free space to download the Windows 8.1 Setup program: about 1.8 GB for the 32-bit version and about 2.3 GB for the 64-bit version.
Once you have your product key and are on a PC running Windows 8.1, Windows 8, or Windows 7, follow these steps:
  1. Run the Windows 8.1 Setup program.
  2. When prompted to run or save the file, choose Run
  3. When prompted to enter a product key, enter the 25-digit product key you received when you bought Windows 8.1.
  4. When prompted to install Windows 8.1, select Install by creating media, and then click Next.
  5. Select the type of media you want to use: either a USB flash drive or a DVD.

    To create a USB flash drive

    1. Click USB flash drive.
    2. Plug the USB flash drive into a USB port on your PC.
    3. When prompted, select the USB drive you want to use and then click Next.
      If you have files on the USB flash drive, they'll be deleted.

    To create a DVD

    1. Click ISO file and then select the location to save the ISO file.
    2. Insert a blank, recordable DVD into your DVD drive.
    3. Burn the ISO file to the DVD using Windows Disc Image Burner, or another DVD burning program.

Note

Monday, February 24, 2014

cara download buku di google book dengan mudah

cara download buku di google book dengan mudah


Cara download buku di google book dengan mudah, 

    Assalamualaikum sahabat, bagaimana kabarnya nih? pastinya sehat kan alhamdulillah, oh iya sahabat admin pada kesempatan kali ini, admin ingin berbagi cara download buku di google book, dua hari yang lalu admin sudah coba download buku di google book, alhamdulillah berhasil, bagi sahabat yang ingin mencoba bisa mengikuti langkah langkah yang admin lakukan seperti di bawah ini.

     Untuk cara nya, sahabat install di komputer software yang namaya google book downloader.
bagi sahabat yang belum punya software ini, sahabat bisa download di link yang sudah admin sediakan buat sahabat, untuk download sahabat bisa click google book downloader
seperti file  berfotmat exe lainya cara installnya pun hampir sama.

Wednesday, February 19, 2014

Cara Setting Modem ADSL Linksys WAG120N

Sebagai orang awan dalam dunia per internetan. Saya ingin berbagi pengalaman "Cara Setting Modem ADSL Linksys WAG120N"
  1. Atur IP Address dengan Obtain an IP Automatically
  2. Pasang dengan benar perangkat modem tersebut, mulai dari kabel  telpon, di pasang ke spliter dan ke modem.
  3. Kemudian Kabel UTP pasang ke lubang port di belakang modem dan di hubungkan dengan switch
  4. Setelah selesai pengkabelan, masuklah ke tahap pensetingan modem.
  5. Buka / Klik icon buat browsing pada layar komputer, baik itu dari mozilla, google chrome, dll
  1. Ketik di alamat Address dengan IP modem tersebut. Tapi untuk pertama bisanya pakai IP : 192.168.1.1
  2. Kemudian akan muncul tool box seperti ini:

Sunday, February 16, 2014

Cara Install Google Android Di Virtual Box (Lengkap)

Cara Install Google Android Di Virtual Box (Lengkap)


Android, siapa yang tidak mengenal nama tersebut? Belakangan ini nama itu menjadi semakin populer terutama bagi para pengguna smart phone khususnya. Ya Andorid merupakan sebuah  sistem operasi untuk perangkat mobile, semenjak kemunculanya beberapa tahun yang lalu sistem operasi ini telah mendominasi pasar.

Bagi anda yang tidak mempunyai cukup budget untuk membeli perangkat mobile bersistem operasi android ini, anda bisa mencoba menginstal sistem operasi tersebut ke dalam perangkat komputer atau laptop anda. Sistem operasi khusus untuk PC ini dinamakan android x86.
Android x86 bisa di pasang secara permanen ke dalam sistem komputer anda, atau secara virtual (simulasi). Di blog ini membahas cara menginstal Andorid ke dalam virtual box (simulasi). Langsung saja.
Hal yang di butuhkan untuk menginstal Android antara lain:

Friday, February 14, 2014

How to Reset Windows 8 and Windows 2012 Server Administrator or User Password – When You Do not Have A Choice

How to Reset Windows 8 and Windows 2012 Server Administrator or User Password – When You Do not Have A Choice


When we forget a user password especially the administrator password in Windows operating systems, that really puts us in difficult situation. By default Windows OS is having few options to recover the forgotten passwords, like password hints and reset disks. Also, you could find few tips to recover them by using OS CD/DVD or system restore points. But how about a situation that nothing is working or you do not have any backup plans to recover the administrator password?. This guide shows how you can use a simple software to reset Windows 8 and Windows 2012 server administrator passwords within a minute.
This Windows 8 password reset tool is not free, it’s a paid and 100% working solution. There are few free password recovery softwares available on internet, but most of them are difficult to use by novice computer users. Even expert users might struggle at the first time with these free utilities.
windows 8 admin password reset
Spotmau BootSuite 2012 is the product used in this guide to reset Windows 8 and Windows 2012 administrator passwords easily. This tool simply removes the particular user password instead of finds it. I prefer this method because finding a password normally takes time as it needs to check with some dictionaries.
Spotmau BootSuite 2012 is not only having Windows password reset tool but also several useful must have tools for your desktop or server computer.
Rescue crashed computer or hard drive, data recovery from crashed computer or hard drive, recover your Windows CD and office product key, partition, format and clean up your hard drive, backup and restore files and system, clone entire hard drive or partition are the other useful utilities you will be getting with this great product.
Click here to visit product page and find out more information.

How to Reset Windows 8 Administrator Password

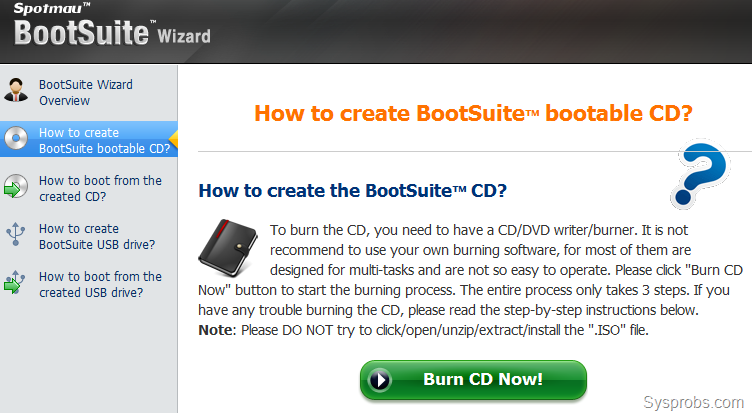
Once you have downloaded Spotmau BootSuite 2012, you must install it on a computer to make bootable CD.
bootsuite cd make
Then insert it to the Windows 8 computer where you need to reset administrator or other users password.
windows 8 error by wrong password
Once the computer booted with Spotmau bootable CD, you can go to ‘Password & Key Finder’ menu as shown below.
main screen to recover admin password in windows 8
Click on the ‘Admin Password Resetter’ button to reset Windows 8 admin password.
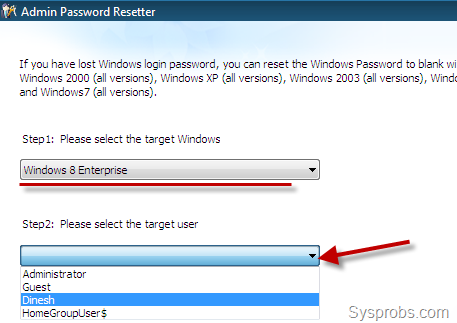
It automatically detects the OS type. You need to select the user from drop down box for resetting.
select user
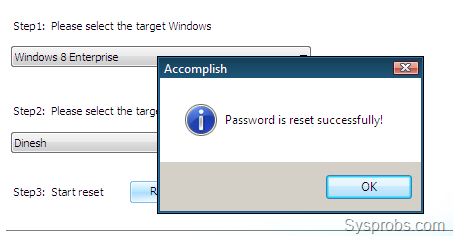
Yes, that is so easy. Just press Reset button and confirm it again. You will get a successful password reset message.
success screen
After password has been reset, you can reboot the PC and login without entering a password for particular user.
Click here to download the best Windows 8 password reset tool – Spotmau BootSuite 2012

How to Reset Administrator Password in Windows 2012 Server

Spotmau BootSuite 2012 works well on Windows 2012 server versions to reset forgotten admin password.
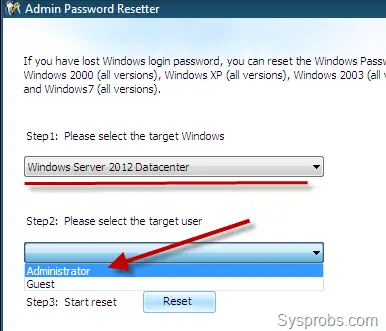
Once you booted server OS with bootsuite CD, you can go to same place to reset admin password. The utility detects 2012 server version automatically. Select the user account that you need to reset the password.
reset screen in windows 2012
It does the job well by removing the forgotten administrator password in Windows 2012 datacenter version. After the password has been successfully reset, you can loing to to server without typing any passwords. Here is my server which logged in with administrator account without any passwords.
after reset in windows 2012
This product is really good and I’m using it for last three years, it never let me down on desktop or server computers to reset passwords. 100% success password reset rate and 90 days money back guarantee available from software vendor.
Click here to download the product and read more information.
http://www.resepkuekeringku.com/2014/11/resep-donat-empuk-ala-dunkin-donut.html http://www.resepkuekeringku.com/2015/03/resep-kue-cubit-coklat-enak-dan-sederhana.html http://www.resepkuekeringku.com/2014/10/resep-donat-kentang-empuk-lembut-dan-enak.html http://www.resepkuekeringku.com/2014/07/resep-es-krim-goreng-coklat-kriuk-mudah-dan-sederhana-dengan-saus-strawberry.html http://www.resepkuekeringku.com/2014/06/resep-kue-es-krim-goreng-enak-dan-mudah.html http://www.resepkuekeringku.com/2014/09/resep-bolu-karamel-panggang-sarang-semut-lembut.html